
ROES Server Multi-Workstation Database And Configuration
The ROES Server default configuration uses a file for a database and it only allows a single connection. When you want to add more ROES Server workstations, you will need to change your setup to a 'server mode', using either the built in database or MySQL or MSSQL
**Use the gear in the upper right corner of the ROES Server UI to access the ROES Configuration screen.**
**Note: If you intend to use the built in HyperSQL database, you will use only one workstation to host the database.**
Primary Workstation
Follow the steps under the graphic to configure the primary station first.
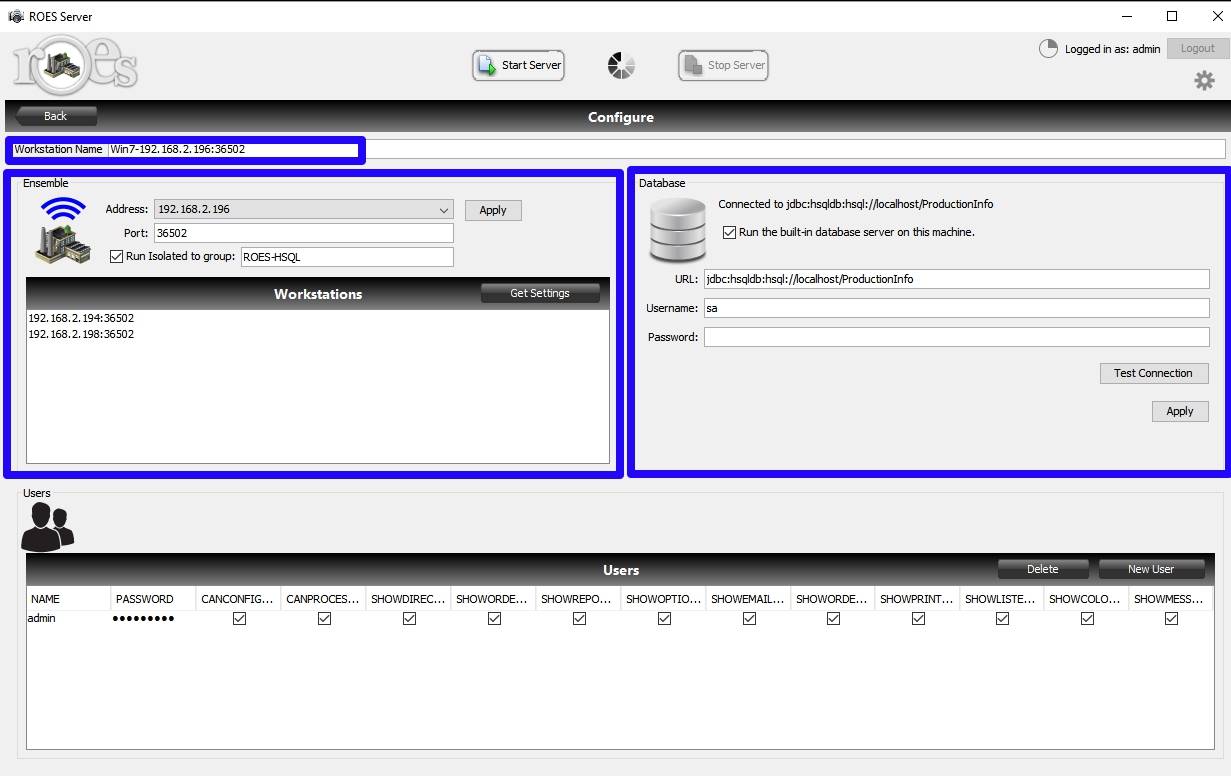
Workstation Name - Name the workstation by appending to the front of the default workstation name. Use something meaningful like "Main" (Example: Main-192.168.2.196:36502). Then, hit the 'Apply' button.
Database Section
Checkbox - The “Run the built-in database server in this machine” should be checked. Checking the box will load a default connection string that uses "localhost" and assumes the database will be on this computer.
URL: (Connection String) - Replace "localhost" with the IP address of this computer
Was: jdbc:hsqldb:hsql://localhost/ProductionInfo
New: jdbc:hsqldb:hsql://192.168.0.196/ProductionInfo.
Username: and Password: - Username may be changed to be any user with administrative privileges but 'sa' with no password is already created and works well.
Apply Button - Use the 'Apply' button to load these settings
Test Connection Button - Use the 'Test Connection' button to verify these settings. You should get a popup saying "Successfully connected to the database"
Ensemble Section
Address: - The Address should be the IP of the the primary (this) station. If multiple NICs are installed select the IP address you wish to use from the pulldown.
Port: - The Port should be 36502. If that port is already in use in your lab, you will want to select a different port to prevent conflicts. This is the port all ROES Servers will communicate on.
Checkbox (Run Isolated....) - The "Run Isolated to group:" should be checked and any secondary station should have the box checked and the same group.
Apply Button - Use the 'Apply' button to load these settings.
Secondary Workstations
Follow the steps under the graphic to configure any secondary stations.

Workstation Name - Name the workstation by appending to the front of the default workstation name. Use something meaningful and unique like "ColorCorrection1" (Example: ColorCorrection1-192.168.2.196:36502). Then, hit the 'Apply' button.
Database Section
Checkbox - The “Run the built-in database server in this machine” should NOT be checked. Only one station should have this box checked. If you are running MySQL or MSSQL NONE of the boxes should be checked..
URL: (Connection String) - The URL for the db will be something like. jdbc:hsqldb:hsql:// IP_OF_PRIMARY /ProductionInfo Where IP_OF_PRIMARY is the IP address of the primary station. Like: jdbc:hsqldb:hsql://192.168.0.196/ProductionInfo.
Username: and Password: - Username and Password will be the same as the Primary station; sa with no password.
Apply Button - Use the 'Apply' button to load these settings
Test Connection Button - Use the 'Test Connection' button to verify these settings. You should get a popup saying "Successfully connected to the database"
Ensemble Section
Address: - The Address should be the IP of the the secondary (this) station. If multiple NICs are installed select the IP address you wish to use from the pulldown.
Port: - The Port should be 36502. If that port is already in use in your lab, you will want to select a different port to prevent conflicts. This is the port all ROES Servers will communicate on.
Checkbox (Run Isolated....) - The "Run Isolated to group:" should be checked with the group matching the primary station.
Apply Button - Use the 'Apply' button to load these settings.
Get Settings - You can use the 'Get Settings' features to configure the first tabs of this new workstation. Here is a link to the page explaining that.
Documentation version 4.2,2016/04.