
ROES V9.6 FUNCTIONS/FEATURES
On 2/13/18, live ROES launches using v9.0 or 9.5 were migrated to 9.6.
NEW IN DESKTOP &
WEB 1/2019: PACKAGE OPTIONS
ROES
now offers the ability to have Option sets on lab
defined Packages that can apply to the Package as a whole, each template via
one selection, or show separately for selection on each template in the
Package. The new attribute to define on
the parent and child Options is per_template, with 3
choices: true, package, and false. True will show the Option set once for the
entire package, but add the selected Option to each
Template in the Package to the order.
Package will show the Option set only once as well but only add the
selected Option once to the order as part of the Package. False represents the default behavior for an
Option set when defined off a Package container – it will show separately for
each Template in the Package for selection.
Here
is how they appear in Desktop and Web as true, package and false:

NEW IN DESKTOP &
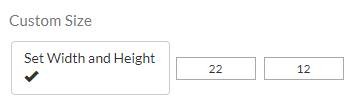
WEB 9/2018: ROES CUSTOM SIZES
The
ability to offer custom print sizes is now available in the latest Desktop v9.6
and ROES Web. Using an Option, a
customer can enter a desired width and height.
The
product/node will be adjusted for the size and new price calculated for the
item based on the size. The following
attributes are used:
needs_size - set with value of [width]*[height]
price
– value to charge per sq.inch
heightmin, heightmax, widthmin, widthmax - in order to
define different pricing for different size ranges, such as prints to 10x10,
20x20, 30x30, etc.
you
can have different Options to limit the values available for the customer to
define
heightincrement and widthincrement -
Set to value of 0.5 to limit size entries to half-inch increments
Note:
The calculated price is in addition to any value set for the template
"price" attribute, so you may want to have no price on the template
itself.
Option
in Template Tool:

That
Option in ROES Desktop:

In
ROES Web:
FACE DETECTION
New
functions in v9.6 are focused on face detection and the Events module. For a document of Face Detection please visit
http://www.roesu.com/Training/RUG/2017/ROESFaceDetect.pdf.
EDITING
PACKAGES
ROES 9.6 changes how package edits are done from the cart.
Packages will be edited as the entire package, returning the customer to
the same workspace they added the items from initially, showing all components
of the package.
CATALOGS MUST HAVE
U_ID’S!
Please
make sure all of your Catalogs in each templates file
have u_id attributes defined on them.
ROES
Version 9.5 Features/FAQ
ROES v9.5 was
released May 25, 2016. ROES v9.5
received a lot of positive feedback at the 2016 RUG Meeting, and enhancements
added since then are a direct result of that feedback and testing. Information on the new features:
New Multi-order (Video)
ROES v9.5 adds
support for orders from multiple Catalogs in one ROES order .ro file, what we call Multi-order. In the cart each item added while in the
respective Catalog, with a separate total listed for each. Clicking Show Order/Receipt at the top of the
cart pane will open multiple preview reports, in most cases using browser tabs
for each one. The Order Options for each
Catalog will display in a longer scrolling pane on the right of the cart to
allow selection to ensure desired/required Options get selected, with alerts
thrown for any needed.

During checkout
each Catalog’s Shipping Methods will be shown to allow for proper Shipping
price additions. Multi-Order is not
enabled by default in v9.5. To enable,
add attribute multiorder set to true to Configuration
element off the root in templates file.
What ROES Server versions will support
ROES v9.5 orders and Multi-orders?
ONLY the
current ROES Server version 3 can process Multi-orders. ROES DP2 Server 1.1.2 and higher will process
multi-orders as single orders and standard single Catalog orders.
New webview (video)
Implementation
of JavaFX allows for full HTML5 support within the splash page, information
Templates and Options. To enable the new webview
ability, add attribute webviewurl onto a Template or
Option in Template Tool. The value is a full URL to a web page. The
new webview can be used to replace tooltips for a
richer user experience, offering a browser-like environment over the program
pane. Options with webviewurl on them will
receive an info icon to their right to be clicked for additional information:

The new webview enhanced functionality will appear always by
default for the splash page in the Home pane.
Links using roessplash values in the splashtip to show additional pages will need to be
converted to http links for v9.5. All
http links will be displayed within the splash area of the home pane. For multiple viewed pages, navigation arrows
will appear in the upper left of the splash area to go back or forward.
New ROES Search (video)
The
new Search tool is enabled by default, showing with the field and the
magnifying glass icon at right of Catalogs drop-down. Selection of label presents products as if it
was selected in Sizes, and looks across Catalogs. Searches can be limited to just the current
Catalog by checking the This Catalog checkbox.
To disable search you can add attribute searchcatalogs set to false on the Configuration element.
PayPal (video)
The new PayPal
integration can be set up in your ROES as a payment method. Please review the document at http://www.roesu.com/Training/RUG/2016/ROES_PayPal_Setup.pdf. Once your business PayPal account is ready,
SWS staff can enable the method in your Test ROES launch for testing and add to
your live launches when ready.
Labels for Masks
The label
attribute can now be added to each mask under Masks to help customers identify
designs.
QR Code Scanning for Events (video)
ROES v9.5 adds
updated support for QR Codes and Subject Cards.
In addition to the subject ID now the cards can be scanned for package
data as well. A new Designer Tool has
been created to add checkboxes to a studio designed subject card that can be
saved in Favorites for use.
New X button to close image folders
A new X button
has been added in the far left bar of the thumbnails
pane under the Add images button to close all open image folders (the hot key
combination holding the ALT or OPT keys and clicking a folder’s X still works
as well).
New Attributes
that can be set on Configuration element off root of templates file:
saveinfobox set to false – removes checkbox to save
credit card info, ideal for kiosk use
quitconfirm set to false – no alert on exit but
will still auto-save
switchtooptionsontemplateselect set to true – jumps from Text entry pan
to Options pane when switching Templates
booksviewenabled set to true – removes the user book
pages over the workspace (so only the possible pages are there), and adds three
toggle buttons on the control bar next to the page flip buttons: workspace -
goes to workspace; grid - replaces workspace with book sections shown
vertically, with pages in 3 column grid; row - replaces workspace with
horizontal scroller like old film strip
Do my templates files need to be
encrypted?
You do not need
to be running an encrypted templates file for v9.5, though we strongly
encourage all to do so. Remember,
templates need to be encrypted for use in Template Tool 8 and the new Template
Tool 9 that is built into the new ROES Client.
A video on encryption can be found at http://www.roes-u.com/Training/TTool/Templates%20File%20Encryption/Templates%20File%20Encryption.html. The new enc file should be tried using a
browser to pull the file via direct URL.
If it succeeds in downloading, please advise us of the new file names on
your site and then we can change the calls in the startup here and test
them. Once completed and running the old
zip files can be deleted from the web.
ROES V9 MIGRATION INFO & FAQ
All
test ROES launches have been migrated to the ROES Version 9. Pertinent information of using new features
and other tips are below. Reminders for
ROES V8 changes needed to the templates file are listed further down. A primer on v9
changes can be found at http://www.roes-u.com/Training/ClientV9/V9CoreChanges.pdf.
Do my templates files need to be encrypted?
You do not need to be running an encrypted templates file for v9,
though we strongly encourage all to do so. Remember, templates need to be encrypted
for use in Template Tool 8 and upcoming Template Tool 9. A video on encryption can be found at http://www.roes-u.com/Training/TTool/Templates%20File%20Encryption/Templates%20File%20Encryption.html. The new enc file
should be tried using a browser to pull the file via direct URL. If it succeeds in downloading, please advise us of the new file names on
your site and then we can change the calls in the startup here and test
them. Once completed and
running the old zip files can be deleted from the web.
What ROES Server versions will support ROES v9 orders?
ROES Server version 2.1.5 and higher and ROES DP2 Server 1.1.2
support v9 orders. New ROES
Server v3 will be deployed to all in the near future and ROES DP2 Server 1.1.2
has just been released.
What is the new Tools tab and text entry?
In ROES Version 9 text entry is performed in the upper right Tools
tab in the Option pane. Upon
selection of a text node the Tools tab will automatically display and you can
begin typing immediately. Text
entered will display in both the entry field and the node at the same
time. Controls for font and
color will be displayed.
How do I enable the enhanced text features, the new Styled Text?
The new Styled Text adds new text handling to allow for different
fonts, sizes and colors of text inside the same node. Styled Text can be enabled throughout
the program by adding the Configuration element to your templates file with the
styledtext attribute
set to true. If you already
have For any product you want to restrict the new
text from simply add the styledtext attribute
set to false on the Template.
What can I do with the new PromoCode Manager
and where are codes entered in ROES v9?
ROES Version 9 and new Promocode Manager 2.1 allow for BOGO offers and
more enhanced discount controls with promotional codes. A primer on entry and display can be
found at http://www.roes-u.com/Training/ClientV9/Client_Version_9_Promos.pdf. The guide for Promocode Manager 2.1 can be found at http://www.roes-u.com/Training/Promocode/Promocode2_1/PromoCodeManager2_1.html.
What is new in Events?
If Events is active on your launch a new Catalog will always
display for Subject Cards.
What is the new Books Wizard mode and how do I enable/use it?
The new Books Wizard mode in ROES v9 allows you to turn on a wizard
mode at the Catalog level by using the new wizard attribute set to true. When set the template groups of books
will display as icons in the wizard instead of tabs. Thewizardbackground attribute can be set to define a URL
to a background image to be used by the wizard display. At the template group level, such as
an album type (i.e. “Diamond Albums”) you can use the following attributes:
- icon: Full URL to an icon to use for
selection of a certain type of book in the wizard
- description: Text or HTML encoded text
to be used for describing the book group type
- wizardbackground:
Full URL to file to be used for the next wizard step
- wizardsteptitle:
Title to be used for the next wizard step
One each book container the icon and description attributes should
also be set to represent the desired exact book and description of the size and
other necessary information. A
visual can be seen at http://www.roes-u.com/Training/ClientV9/Book_Wizard_Key_Attributes.pdf.
Is there something new with the logging in ROES Version 9?
To ensure the roeslog does
not grow too large, we are zipping that file up first during order creation at
the customer system. When
the order unpacks, the roeslog.log file will still be there but it is actually
a zip file. Rename the
extension to .zip and then you will be able to extract the roeslog if needed.
ROES
Version 8 Reminders
ROES
v8 reminders and tips with instructions and example links below. A video on templates file changes can be
viewed by clicking here.
ORDER OPTIONS CHANGES
It
is best to set ui_columns on your Order Options to 1
(the default when the attribute is added) in each Catalog in the templates
file. The Order Options in the Cart area is a thinner strip column to the right
of the order items list, so having a single column value for these gives a
better appearance.
NEW SHIPPING - SHIPPING
METHODS
Each
Catalog needs a set of Shipping elements added, at least Shipping with one
Shipping Method set off of it (you can create one SHipping
set and Link to it from other Catalogs). These are designed to act in place of
the shipping you have now in Order Options, and you can copy the values from
Option attribute to Shipping Method attribute for things like the id, label and
price (NOTE: DO NOT DELETE THE ID NOR THE PRICE ATTRIBUTES FROM A SHIPPING
METHOD!). An
example of Shipping sets can be found here (example zip also includes an
Order Option to charge a mandatory minimum order fee of .50 if under $5), which
you can download, open directly in Template Tool, and copy and paste into your
Test templates file to test with and edit for your needs. You can also keep
using your current shipping options in Order Options and just have a single
Shipping Method under Shipping in each Catalog, something like 'Use Selected
Shipping From Cart' as the label and setting the default attribute (in the Add
Attribute list) to true on the Shipping Method.
SPECIAL INSTRUCTIONS
The
new UI has no separate Special Instructions/Instructions entry. If desired you
may add an Order Option for Special Instructions that uses the needs_textarea attribute to give customers a field for
this, and set the id of this Option to something like specinst.
On your reports you will want to change the [SPECIAL_INSTRUCTIONS] macro to
[SELECTED_OPTION_TEXT_BY_ID(specinst)] to get the
customer's text (initially you will want to leave both to account for anyone
still submitting orders via the open ROES Pro/old UI, so your line in the
report would be: Special Instructions:
[SPECIAL_INSTRUCTIONS][SELECTED_OPTION_TEXT_BY_ID(specinst)]
- only one should resolve to get data in the order).
REPORTS
For
your reports you will need to add macros to grab the Shipping values, you can
place these where desired (and possibly remove any macros for Special
Instructions if not needed). The macros are:
[SHIPPING_ID] - The "id" attribute of the
selected shipping method
[SHIPPING_LABEL] - The "label" attribute of the
selected shipping method
[SHIPPING_TOTAL_PRICE] - The price value of the selected
shipping method
A typical report line for usage could be: Shipping:
[SHIPPING_LABEL] [SHIPPING_TOTAL_PRICE]
There is also an attribute that can be added on a
Shipping Method called needsaddress that can be used
for drop shipping needs. If used, it requires special macros for reporting:
Name:
[SET_MACRO_FROM_SHIPPING_METHOD_ATTRIBUTE(SHIP_NAME,ship_to_name)][SHIP_NAME]
Attention:
[SET_MACRO_FROM_SHIPPING_METHOD_ATTRIBUTE(SHIP_ATTENTION,ship_to_attention)][SHIP_ATTENTION]
Address:
[SET_MACRO_FROM_SHIPPING_METHOD_ATTRIBUTE(SHIP_ADDRESS,ship_to_address)][SHIP_ADDRESS]
Address 2:
[SET_MACRO_FROM_SHIPPING_METHOD_ATTRIBUTE(SHIP_ADDRESS2,ship_to_address2)][SHIP_ADDRESS2]
City:
[SET_MACRO_FROM_SHIPPING_METHOD_ATTRIBUTE(SHIP_CITY,ship_to_city)][SHIP_CITY]
County:
[SET_MACRO_FROM_SHIPPING_METHOD_ATTRIBUTE(SHIP_COUNTY,ship_to_county)][SHIP_COUNTY]
State:
[SET_MACRO_FROM_SHIPPING_METHOD_ATTRIBUTE(SHIP_STATE,ship_to_state)][SHIP_STATE]
Zip:
[SET_MACRO_FROM_SHIPPING_METHOD_ATTRIBUTE(SHIP_ZIP,ship_to_zip)][SHIP_ZIP]
Country:
[SET_MACRO_FROM_SHIPPING_METHOD_ATTRIBUTE(SHIP_COUNTRY,ship_to_country)][SHIP_COUNTRY]
Phone:
[SET_MACRO_FROM_SHIPPING_METHOD_ATTRIBUTE(SHIP_PHONE,ship_to_phone)][SHIP_PHONE]
A zip of sample reports can be found here.
HOME
HELP URL LINK - BUTTON IN HOME PANE
Please provide a link you would like the customers to get
in a web browser for the 'Get Help' button. This can be a tips page you may
have for ROES, a lab contact page/home page on your web site, or if you desire
we can set it to the www.roes.co page we have set for end-user support,
including usage videos.
SPLASHTIP
- HOME PANE
The splashtip window is now a
part of the Home/Start pane. You can set
up a centered HTML page for use in this spot, with the full URL to the page set
in the text attribute of the Splashtip element in the
templates file. This should allow it to
look the same/correct regardless of the customer's screen resolution. Also, ROES URL's can be used inside the
source of this page to take the customer directly to products. The ROES URL's are built similar to a web
page URL but starts with roes:// instead of http:// and uses the u_id values of the Catalog, Template Group/Groups and
desired Template to land on as the body of the URL. Since you can rename the u_id
values to your liking (provided there are no duplicates!), you can set them to
be easier to use in these links. For
instance, if your first Catalog is Professional Prints - Color Corrected, and
the item you want to link to is a 16x20 on special in a group labeled as
'Specials', you can set the u_id of the Catalog to
corrected, the Template Group of Specials to specials and the 16x20 on sale to
1620promo. Then the proper ROES URL for
this item would be roes://corrected/specials/1620promo to jump to it. In the web page source you could have
something like:
.....<a href="roes:// corrected/specials/1620promo"
target="_blank">Click Here To Order This Week's Special!</a>
The splash screen a centered
HTML page is best, and try to stay away from CSS's as the 'Java pretending to
be a browser' doesn't treat them very well. Simple pages with tables to spread
things around and keep them orderly works well. You can have multiple pages in
place as well, extra pages that can be linked to from the default splash page
and will appear inside the home pane to replace the default page when the link
is clicked. All of these pages can have the ROES URL links that take customers
directly to products as well. A sample
can be seen here, the basic sample pages used are enclosed in a zip
file here.
ACCOUNT
VERIFICATION
For account verification we can pass an HTTP post to a
web page that ingests the data sent (such as account number and password) and
is connected to a database and then verifies the 2 values go together. If so
the page returns a plain response of VALID (all upper case) and the customer
can then access the ordering panes; if not any response beginning with Error:
will be shown. The page, which people have .asp and .php pages in place for,
can also be connected to via SSL if desired.